IP PBX Configuration - 3CXv15
3CX is a software-based, open standard, IP PBX that offers complete Unified Communications features, out of the box. SIP Trunk configuration instructions below apply to the following 3CX versions:
- 3CX v. 15
Please note that this configuration apply to any physical or cloud deployments validated by 3CX.
Documentation is provided for scenarios where a 3CX server uses Static or Dynamic IP address on the public Internet.
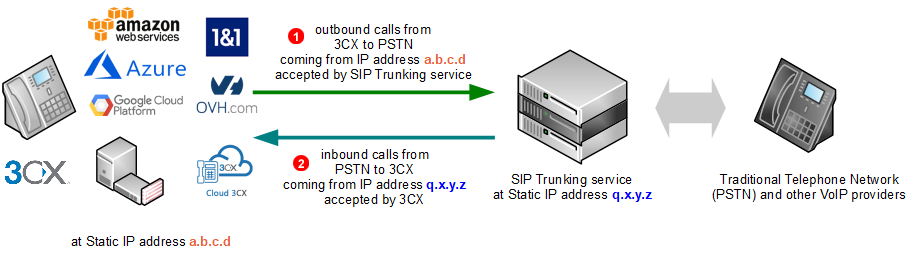
Static IP address
-
Static IP address (
a.b.c.din our example above) of your 3CX server will be added to GoTrunk service IP ACL (Access Control List) and outbound calls coming from that IP address will be accepted without requiring any further authentication (SIP username and password). This is the most efficient way of authenticating SIP calls. -
Inbound calls to one of Telephone Numbers on your GoTrunk account will be sent directly to 3CX public IP address. Since the calls will be coming from known IP address of SIP Trunking service (
q.x.y.zin our example above) 3CX will accept them without requiring any further authentication.
To configure 3CX server to work with GoTrunk SIP trunk using IP authentication the following changes are required:
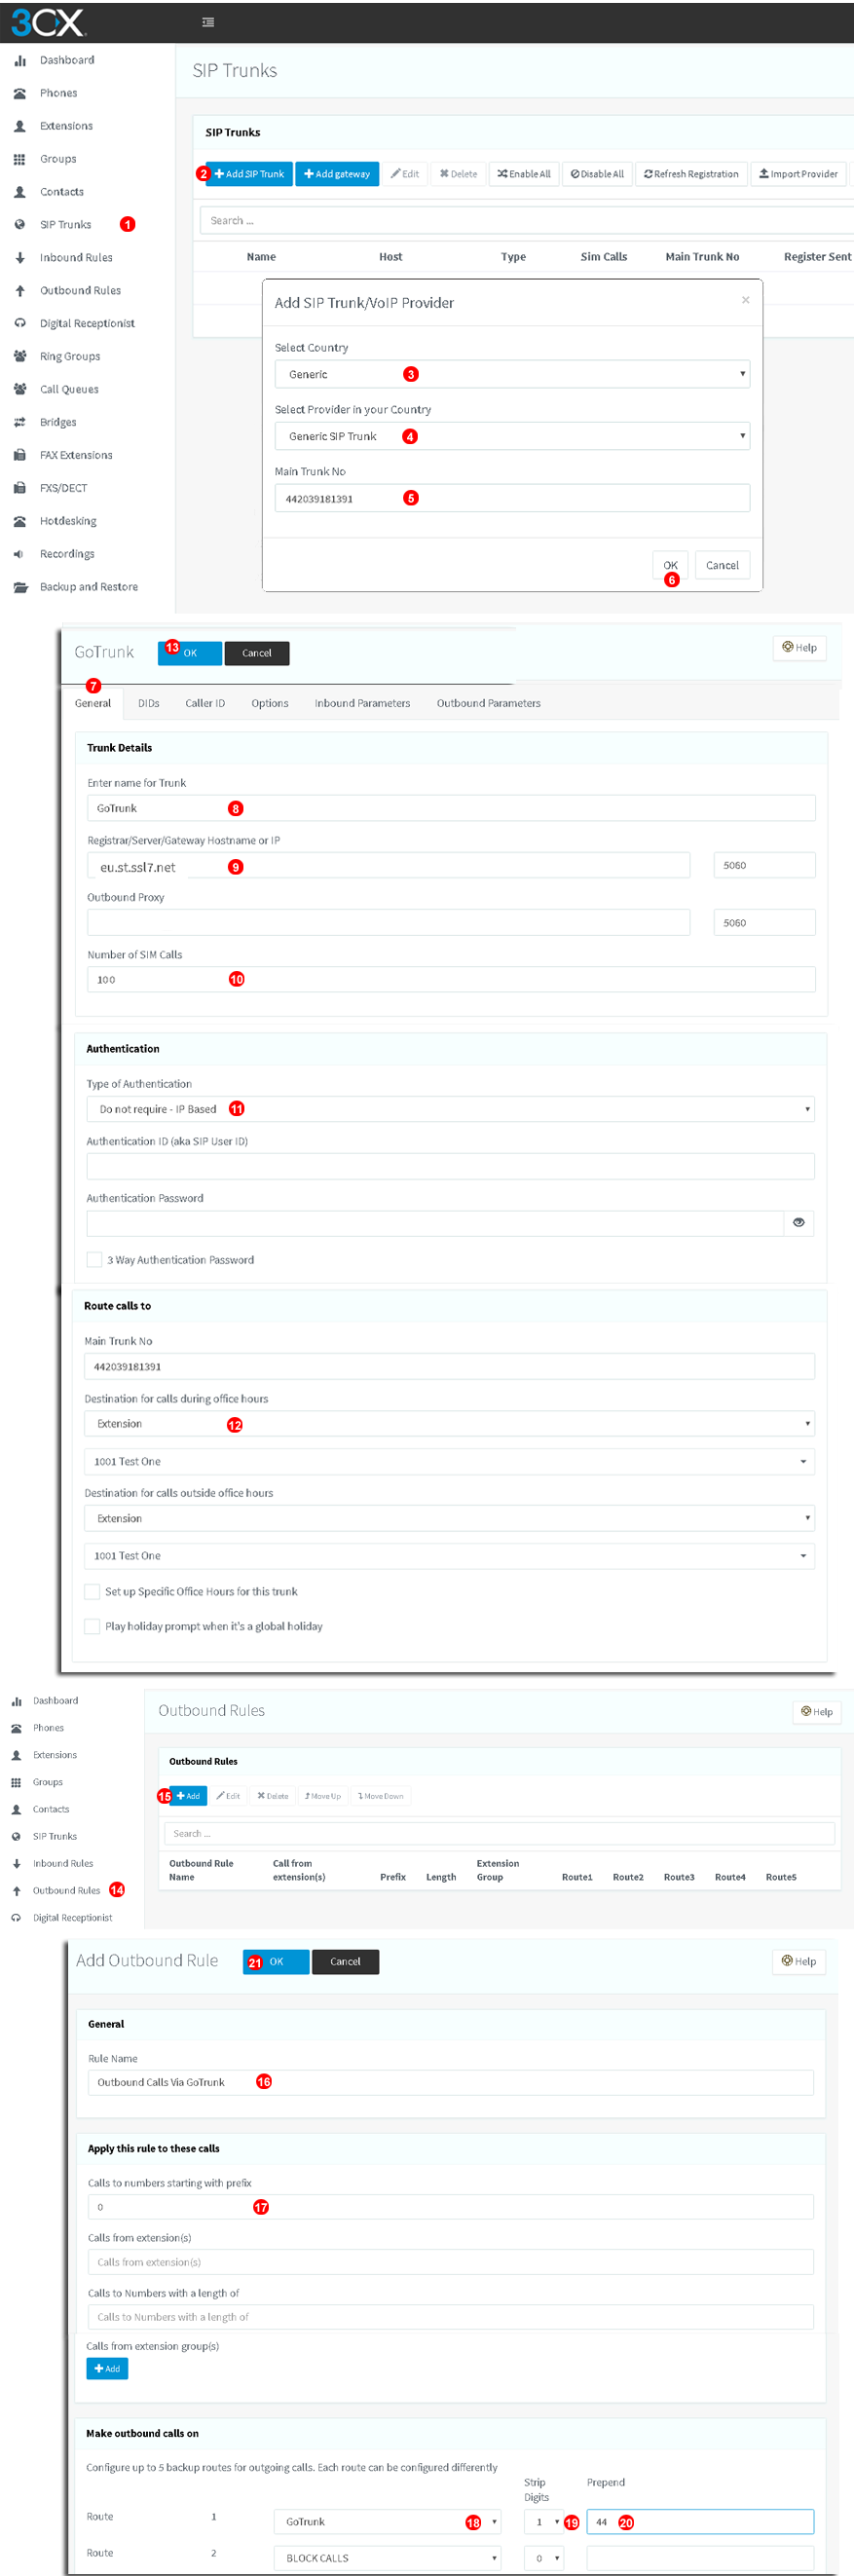
Follow steps below to add SIP Trunk:
- Select
SIP Trunksin left menu. - Click
Add SIP Trunkbutton in top toolbar. - Select
Genericprovider from "Country" drop down list. - Select
Generic SIP Trunkfrom "Provider in your country" drop down list. - Enter you public number Ex: 442039181391 in the "Main Trunk No" text box
- Click "OK" button.
DETAILED CONFIGURATION
- Detailed configuration window of the trunk will appear. Make sure you are on
Generaltab. - Enter GoTrunk into "Name for Trunk" field.
- Enter
eu.st.ssl7.net(for Europe POP) into "Registar/Server/Gateway Hostname or IP" (oramn.st.ssl7.netto use North America POP). - Enter 100 into "Number of SIM Calls"
- Authentication Type must be set to "Do not require -IP Based"
- Select default destination for inbound calls.
- To apply changes click "OK" button on top.
OUTBOUD ROUTING Note that example below is for illustration purposes only. You may want to create additional outbound routing rules as per your requirements.
- Click
Outbound Rulesbutton in top toolbar. - Click
Add Outbound Ruleo configure Outbound Routing rule. - Enter
Domestic calls via GoTrunkinto "Rule Name" field. - Enter
0into "Calls to numbers starting with prefix" - Select
GoTrunkfrom trunk drop down list. - Select
1from "Strip digits" drop down list. - Enter
44(for United Kingdom, enter your own country telephone code as required) into "Prepend" field. - To apply changes click "OK" button on top.
Next follow "Inbound routing" instructions below.
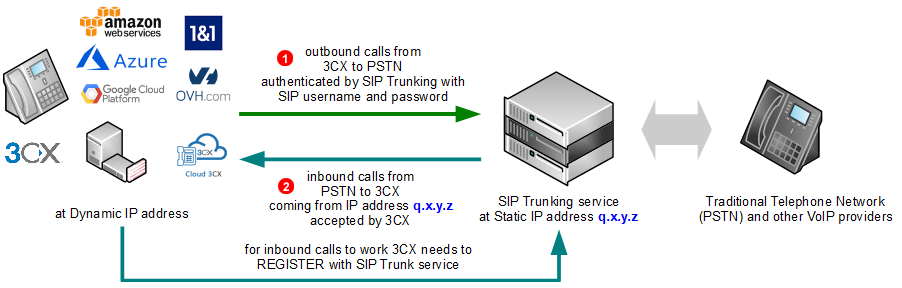
Dynamic IP address
-
For outbound calls from 3CX to GoTrunk SIP Credentials (SIP username and password) authentication is used.
-
For inbound calls to one of Telephone Numbers on your GoTrunk account to work 3CX needs to Register with GoTrunk service (and periodically refresh registration in case IP address changes). Calls will be sent to IP address which was sent in the most recent 3CX Registration. Since the calls will be coming from known IP address of SIP Trunking service (
q.x.y.zin our example above) 3CX will accept them without requiring any further authentication.
To configure 3CX server to work with GoTrunk SIP Trunk using SIP Credentials authentication the following changes are required:
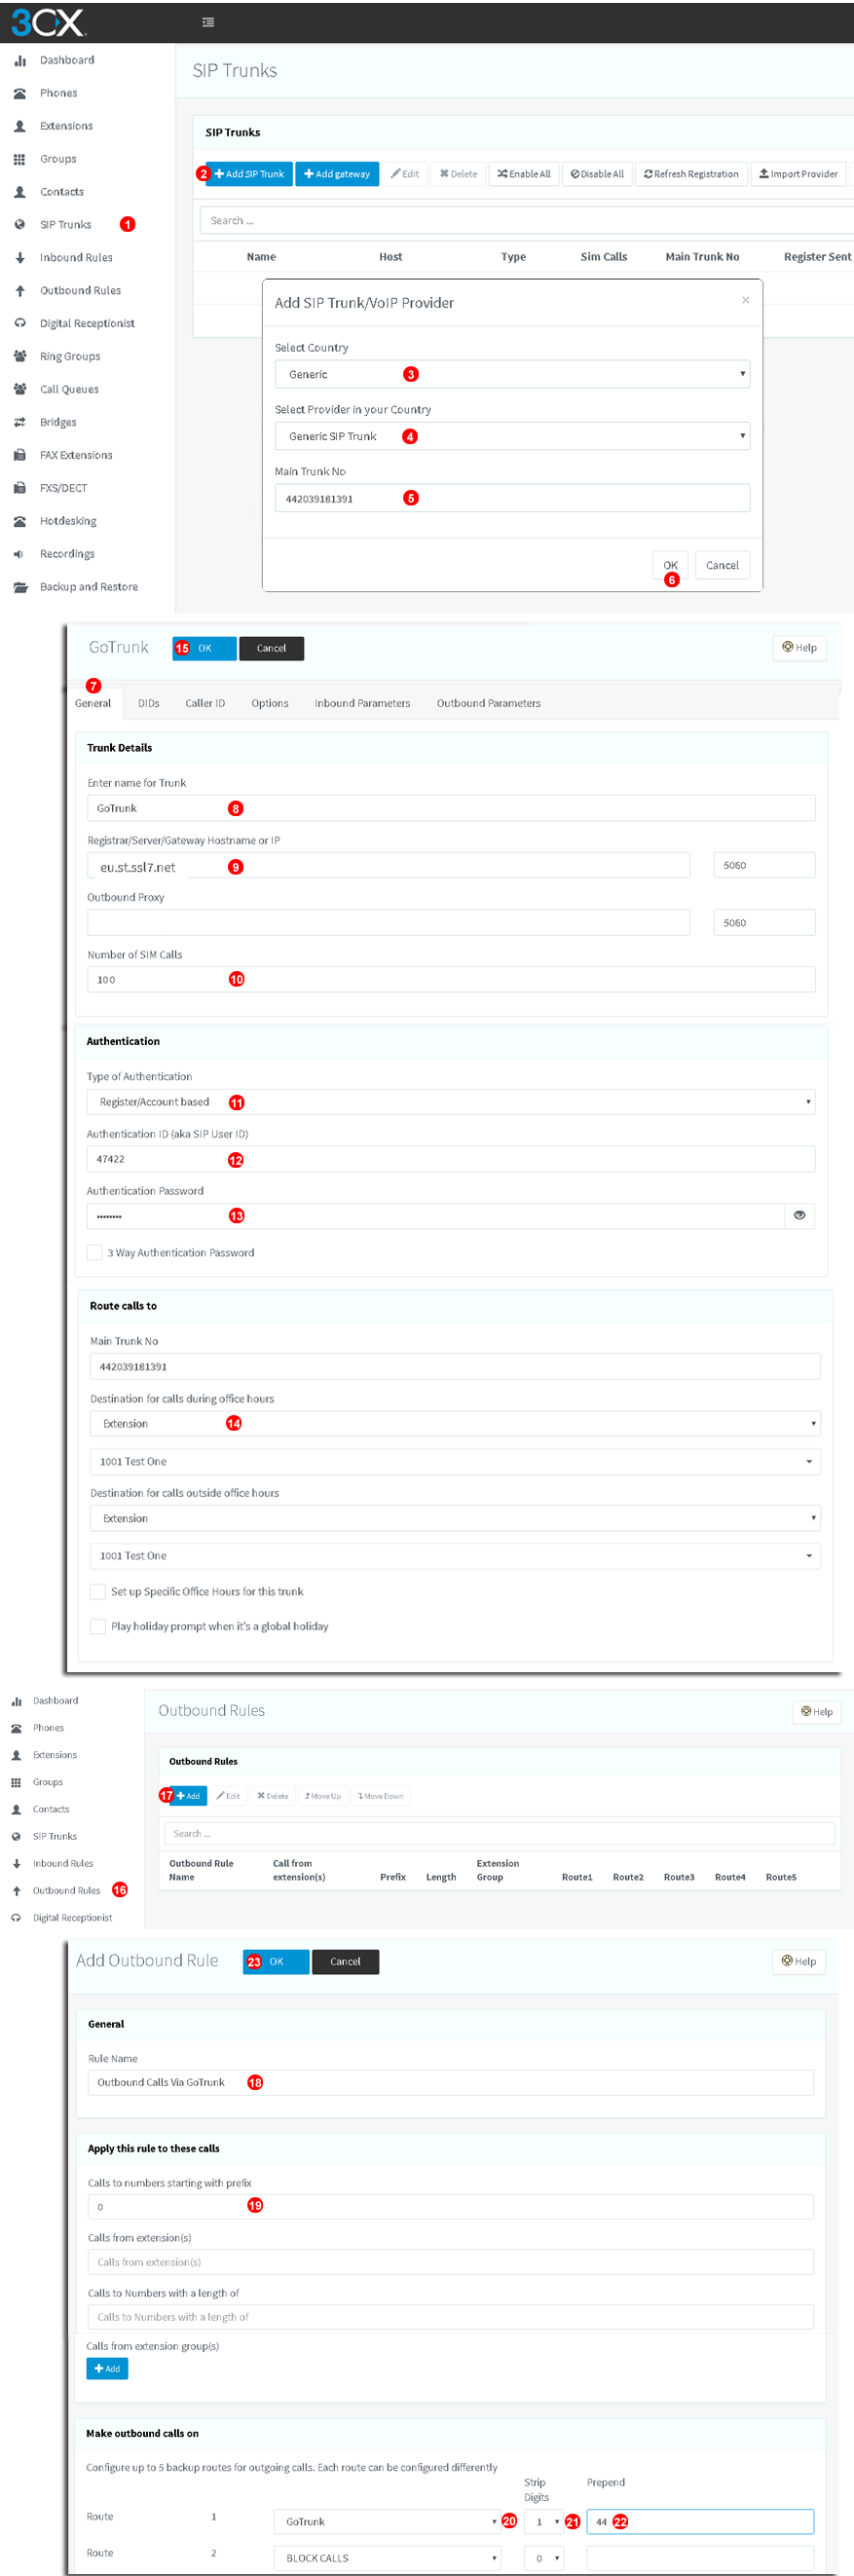
Follow steps below to add SIP Trunk:
- Select
SIP Trunksin left menu. - Click
Add SIP Trunkbutton in top toolbar. - Select
Genericprovider from "Country" drop down list. - Select
Generic SIP Trunkfrom "Provider in your country" drop down list. - Enter you public number Ex: 442039181391 in the "Main Trunk No" text box
- Click "OK" button.
DETAILED CONFIGURATION
- Detailed configuration window of the trunk will appear. Make sure you are on
Generaltab. - Enter GoTrunk into "Name for Trunk" field.
- Enter
eu.st.ssl7.net(for Europe POP) into "Registar/Server/Gateway Hostname or IP" (oramn.st.ssl7.netto use North America POP). - Enter 100 into "Number of SIM Calls"
- Authentication Type must be set to "Register/Account Based"
- Enter your Outbound SIP Username into field "Authentication ID".
- Enter your Outbound SIP Password into field "Authentication Password".
- Select default destination for inbound calls.
- To apply changes click "OK" button on top.
OUTBOUD ROUTING
-
Note: example below is for illustration purposes only. You may want to create additional outbound routing rules as per your requirements.
-
Click
Outbound Rulesbutton in top toolbar. - Click
Add Outbound Ruleo configure Outbound Routing rule. - Enter
Domestic calls via GoTrunkinto "Rule Name" field. - Enter
0into "Calls to numbers starting with prefix" - Select
GoTrunkfrom trunk drop down list. - Select
1from "Strip digits" drop down list. - Enter
44(for United Kingdom, enter your own country telephone code as required) into "Prepend" field. - To apply changes click "OK" button on top.
Next follow "Inbound routing" instructions below.
Inbound Routing
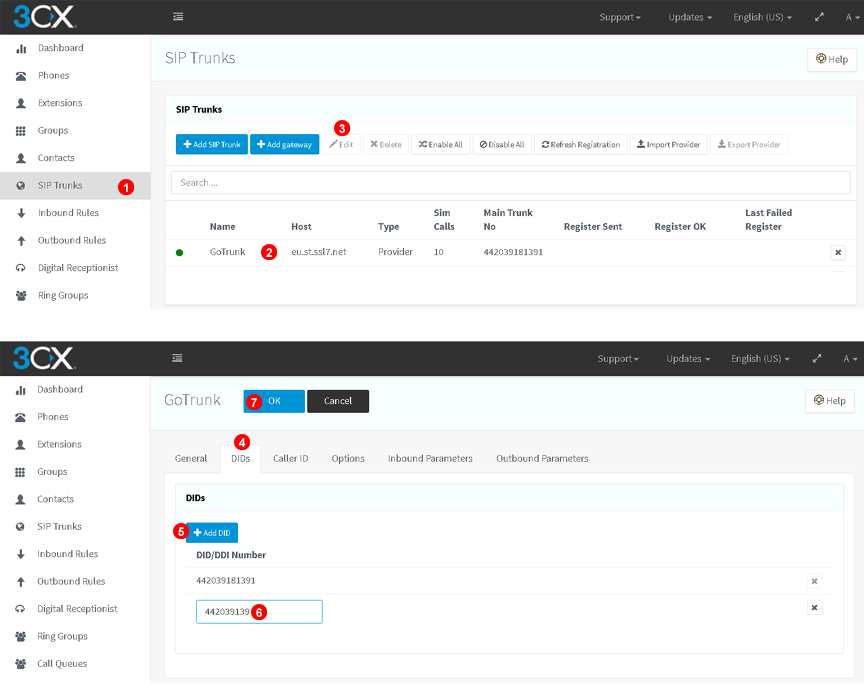
You will need to add all the Telephone Numbers allocated on your GoTrunk account to your 3CX trunk. Follow steps below:
- Select
SIP Trunksin left menu. - Click on the trunk name
GoTrunk. - Click
Editbutton. - Click on
DIDstab. - Click
Add DIDbutton. - Add all DDIs Telephone Numbers allocated on your GoTrunk account.
- Click "OK" button.
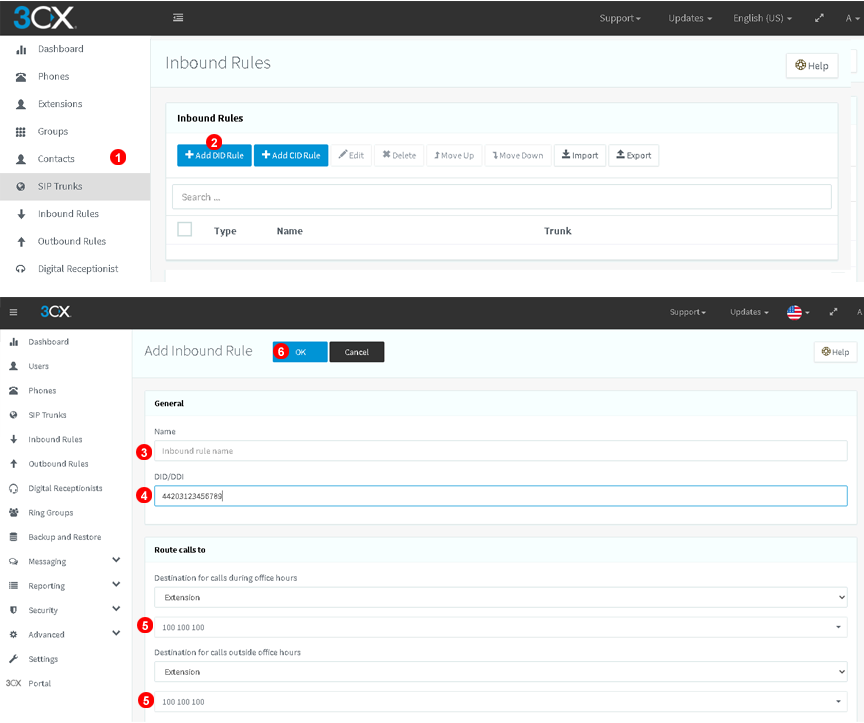
Probably you would like to configure different destinations for each number. Follow steps below to add specific Inbound routes:
- Select
Inbound Rulesin left menu. - Click
Add DID Rulebutton in top toolbar. - Insert a descriptive tag.
- Select the Telephone Number from the drop down list "DID/DDI".
- Select destination for your Telephone Number.
- Click "OK" button.
Call presentation - CallerID
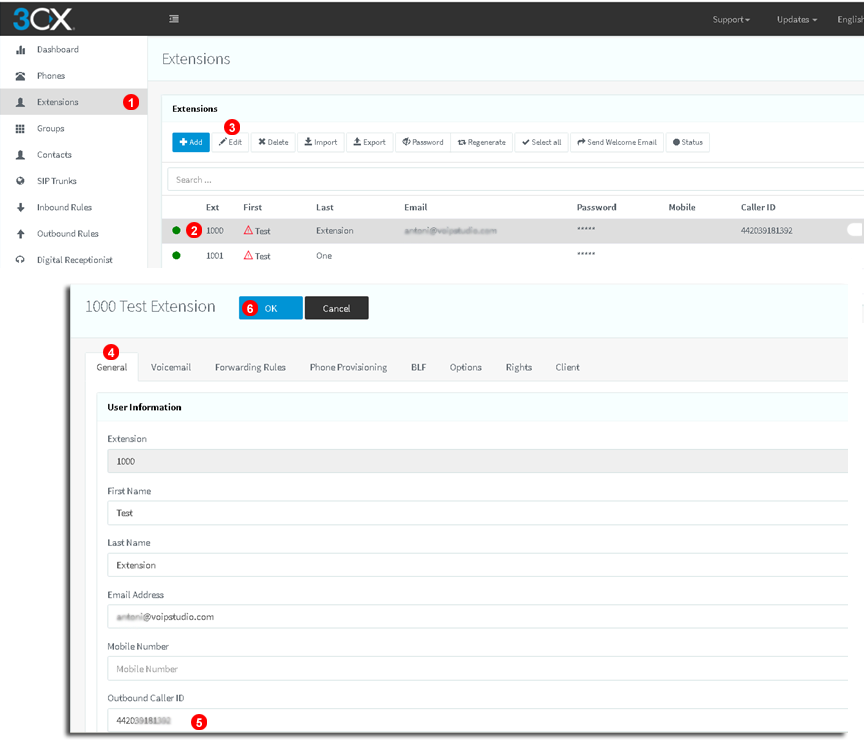
To avoid presenting calls as ANONYMOUS you can set the call presentation individually from extension settings. Follow the steps bellow:
- Select
Extensionsin left menu. - Click on the extension you are going to set the CallerID.
- Click
Editbutton. - Click on
Generaltab. - Fill the field
Outbound CallerIDwith one of your available caller IDs. - Click "OK" button.
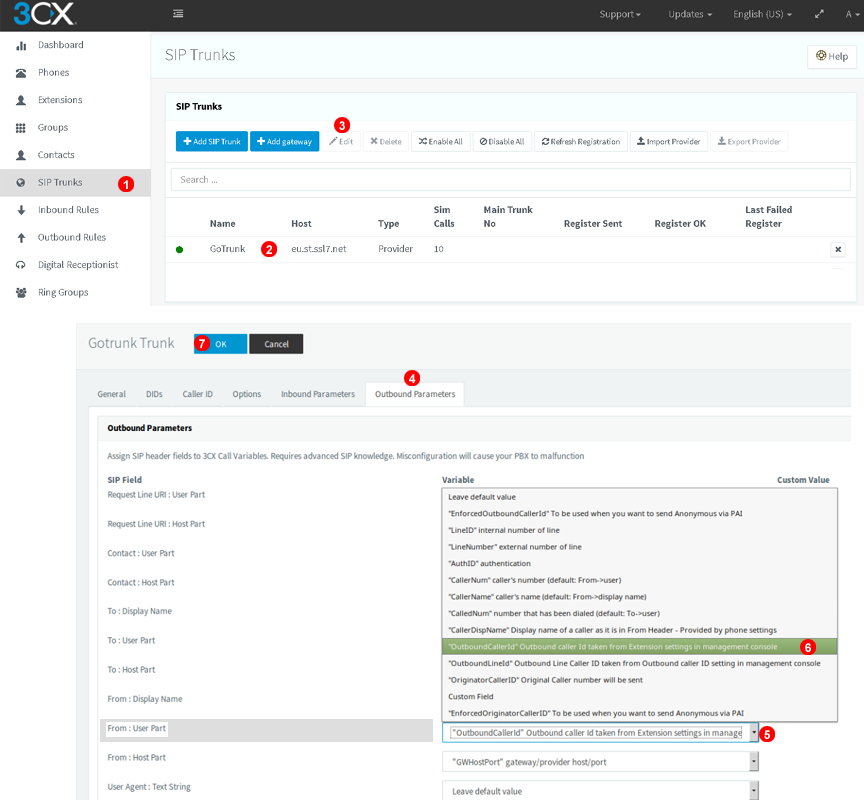
On the trunk you will need to set the field From: User Part to get the value from the extension settings: Outbound Caller ID taken from the Extension Settings. Follow the steps bellow:
- Select
SIP Trunksin left menu. - Click on the trunk name
GoTrunk. - Click
Editbutton. - Click on
Outbound Parameterstab. - Click on the drop-down
From User Partand select - Select
OutboundCallerID: Outbound Caller ID taken from the Extension Settings - Click "OK" button.